Hemispherical photography is one of those tasks often prefaced by the statement, “How hard could it be?” I’m pretty sure I said something like this at the beginning of my PhD when we wanted to ask how the canopy over wood frog ponds influences their larval ecology.
Now, five years, four blog posts, and uncountable hours later, I can say that measuring canopy structure with hemispherical photos is surprisingly difficult.
One of the biggest hurdles is understanding the equipment and deploying it properly in the field. For me, nothing is more tedious than standing waste deep in a mucky, mosquito-infested pond while I fiddle around with camera exposure settings and fine-tuning my leveling device. Add to that the constant fear of dropping a couple thousands of dollars of camera and specialized lens into the water, and you get a good sense of my summers.
So, it is with great pleasure that I offer an alternative method for capturing canopy photos that requires nothing but a cell phone, yet produces higher quality images than a traditional DSLR setup. This new method exploits the spherical panorama function available on most cameras (or in the free Google Street View app). Hemispherical photos can then be easily extracted a remapped from the spheres. You can check out the manuscript at Forestry here (a PDF is available on my Publications page) or continue reading while I walk through the paper below.
The old way
The most common way to measure canopy structure these days is with the use of hemispherical photographs. These images capture the entire canopy and sky from horizon to horizon. Assuming proper exposure, we can categorize individual pixels as either sky or canopy and run simple statistics to count the amount of sky pixels versus canopy or the number and size of the gaps between canopy pixels. We can also plot a sun path onto the image and estimate the amount of direct and indirect light that penetrated through the canopy. (You can follow my analysis pipeline in this post).
All of this analysis relies on good hemispherical images. But the problem is that there are many things that can go wrong when taking canopy photos, including poor lighting conditions, bad exposure settings, improperly oriented camera, etc. Another problem is that capturing images of high-enough quality requires a camera with a large sensor, typically a DSLR, a specialized lens, and a leveling device, which can cost a lot of money. Most labs only have one hemispherical photography setup (if any), which means that we sacrifice the number of photos we can take in favor of high-quality images.
The new way
In the past few years, researchers have tried to figure out ways to get around this equipment barrier. Folks have tried eschewing the leveling device, using clip-on hemispherical lenses for smartphones, or using non-hemispherical smartphone images. I even tested using a hemispherical lens attachment on a GoPro.
But, none of these methods really produce images that are comparable to the images from DSLRs, for three reasons:
- Smartphone sensors are tiny compared to DSLR, so there is a huge reduction in quality.
- Clip-on smartphone lenses are tiny compared to DSLR, so again, there is a huge reduction in optical quality.
- Canopy estimates are sensitive to exposure settings and DLSRs allow for more control over exposure.
The method I developed gets around all of these issues by using multiple, individual cell phone images to stitch together a single hemispherical image. Thus, instead of relying on one tiny cell phone sensor, we are effectively using many tiny cell phone sensors to make up the difference.
Another advantage of creating a hemispherical image out of many images is that each individual image only has to be exposed for a portion of the sky. This avoids the problems of glare and variable sky conditions that plague traditional systems. An added benefit is that, smartphone cameras operate in a completely different way than DSLRs, so they are much less sensitive to exposure issues in general.
Smartphones are less sensitive to exposure issues because, unlike DSLRs that capture a single instance on the sensor when you hit the shutter button, smartphone cameras use computational photography techniques that blend the best parts of many images taken in short succession. You may not realize it, but your smartphone is constantly taking photos as soon as you turn it on (which makes sense since you can see the scene from the camera on your screen). The phone stores about 15 images at a time, constantly dumping the older versions out of temporary memory as updated images pour in. When you hit the button to take a picture, your phone then automatically blends the last few images with the next few images. The phone’s software selects the sharpest pixels with the most even contrast and color from each image and then composites those into the picture presented to you. With every new software update, the algorithms for processing images get better and better. That’s why modern cell phones are able to take photos that can compete with mid-range DSLRs despite the limitations of their tiny sensors.
So, if each phone photos is essentially a composite of 15 images, and then we take 18 of those composite images and stitch them into a hemispherical image, we are effectively comparing a sensor the size of 270 individual phone camera sensors to the DSLR sensor.
The best part is that there is already software that can do this for us via the spherical panorama feature included with most contemporary smartphone cameras. This feature was introduced in the Google Camera app back in 2012 and iOS users can access the feature via the Google StreetView app. It is incredibly simple to use.
Update: Check out my post on tips for taking spherical panoramas
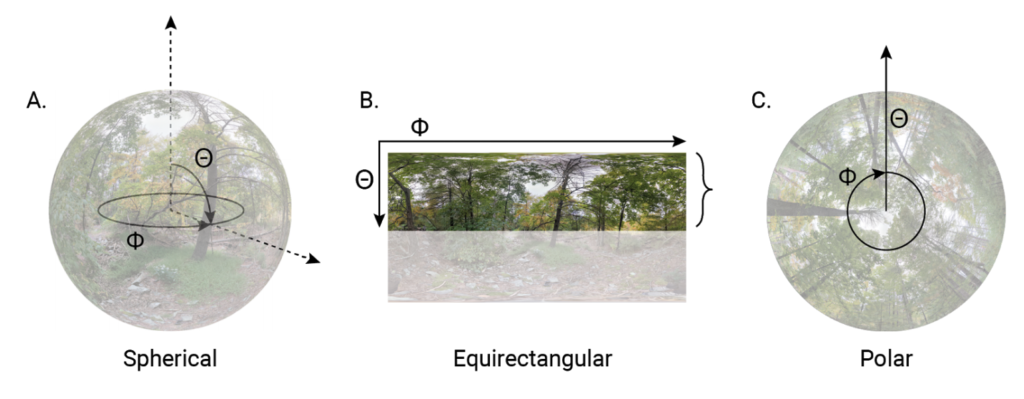
Once you’ve taken a spherical panorama, it is stored in your phone as a 2D JPEG in equirectangular format. The best part about the photo sphere software is that it utilizes your phone’s gyroscope and spatial mapping abilities to automatically level the horizon. This is advantageous for two reasons. First, it means we can ditch the tedious leveling devices. Second, it means that the equirectangular image can be perfectly split between the upper and lower hemisphere. We simply have to crop the top half of the rectangular image and remap it to polar coordinates to get a circular hemispherical image.
How to extract hemispherical images from spherical panoramas
UPDATE: Please see my latest post to process spherical images with R.
Command line instructions
If you are proficient with the command line, the easiest way to extract hemispherical images from photo spheres is to use ImageMagick. After you download and install the program you can run the script below to convert all of your images with just a couple lines of code.
cd "YOUR_IMAGE_DIR"

magick mogrify -level 2%,98% -crop 8704x2176-0-0 -resize "8704x8704!" -virtual-pixel horizontal-tile -background black +distort Polar 0 -flop -flip *jpg
You may need to make a few modifications to the script for your own images. The -crop 8704x2176-0-0 flag crops the top half of the image (i.e. upper hemisphere). Be sure to adjust this to 1.00×0.25 the dimensions of your panorama dimensions. The -resize "8704x8704!" flag resizes the image into a square in order to apply a polar transformation. Be sure to adjust this to 1.00×1.00 the width of your panorama
Note that the code above will convert and overwrite all of the .jpg files in your folder to hemispherical images. I suggest that you practice on a folder of test images or a folder of duplicates to avoid any mishaps.
GUI instructions
If you are intimidated by the command line, extracting hemispherical images from photo spheres is also easy with GIMP (I used GIMP because it is free, but you can follow the same steps in Photoshop).
Update: You can also try out this cool web app developed by researchers in Helsinki which allows you to upload spherical panoramas from your computer or phone and automatically converts them to hemispherical images that you can download. However, I would not suggest using this tool for research purposes because the app fixes the output resolution at 1000p, so you lose all of the benefits of high-resolution spherical images.
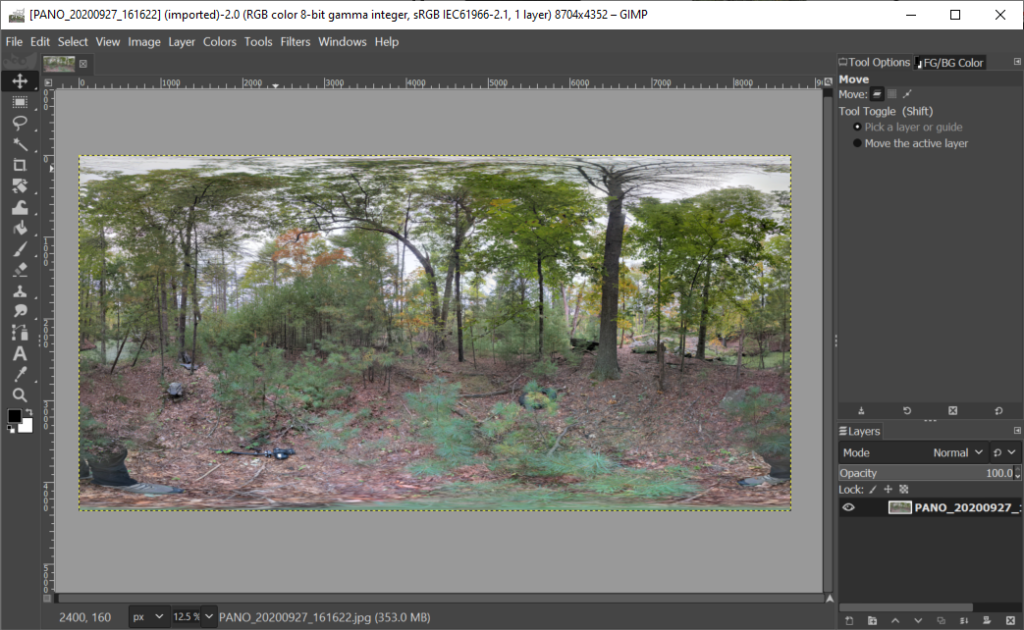
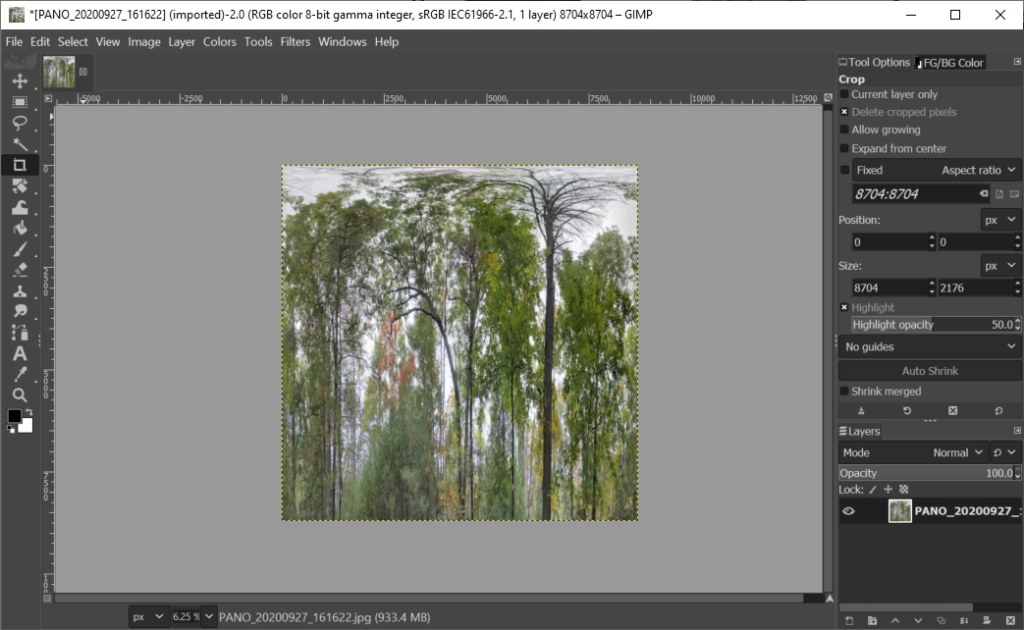
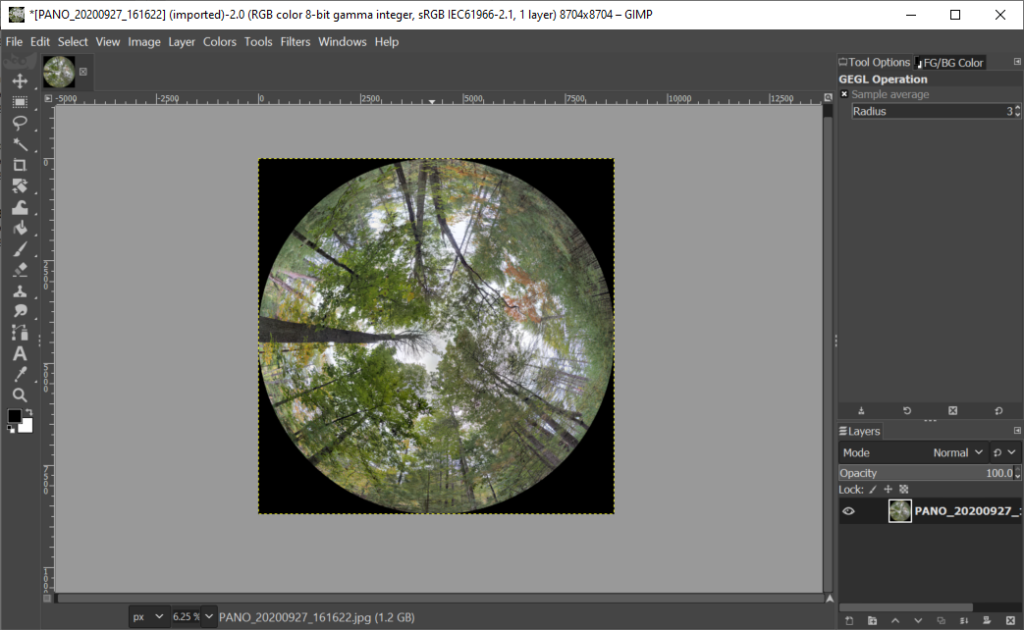
First, crop the top half of the rectangular photo sphere.

Second, scale the image into a square. I do this by stretching the image so that the height is the same size as the width. I go into why I do this below.
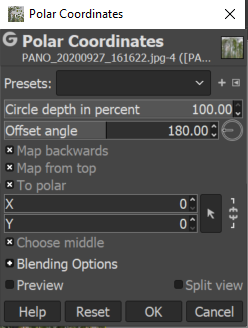
Third, remap the image to a polar projection. Go to Filter > Distort > Polar Coordinates
Fourth, I found that increasing the contrast slightly helps the binarization algorithms find the correct threshold.
All of these steps can be automated in batch with BIMP plugin (a BIMP recipe is available in the supplemental files of the paper). This can also be automated from the command line with ImageMagick (see scripts above and in the supplemental materials of the paper).
The result is a large image with a diameter equal to the width of the equirectangular sphere. Because we are essentially taking columns of pixels from the rectangular image and mapping them into “wedges” of the circular image, we will always need to down sample pixels toward the center of the circular image. Remember that each step out from the center of the image is the same as each step down the rows of the rectangular image. So, the circumference of every ring of the circular image is generated from a row of pixels that is the width of the rectangular image.
With a bit of geometry, we can see that, the circumference matches the width of our rectangular image (i.e. 1:1 resolution) at zenith 57.3 degrees. Zenith rings below 57.3 will be downsampled and those above will be scaled up and new pixels will be interpolated into the gaps. Conveniently, 57.3 degrees is 1 radian. The area within 1 rad, from zenith 0° to 57°, is important for canopy estimates as gap fraction measurements in this portion of the hemisphere are insensitive to leaf inclination angle, allowing for estimated of leaf area index without accounting for leaf orientation.
Thus, we retain most of our original pixel information within this critical portion of the image, but it does mean that we are expanding the pixels (increasing the resolution) closer to the horizon. I tested the impact of resolution directly in my paper and found almost no difference in canopy estimates; so, it is probably okay to downscale images for ease of processing if high resolution is not needed.
The hemispherical image produced can be now be analyzed in any pipeline used to analyze DSLR hemispherical images. You can see the pipeline I uses in this post.
How do images from smartphone panoramas compare to DSLR
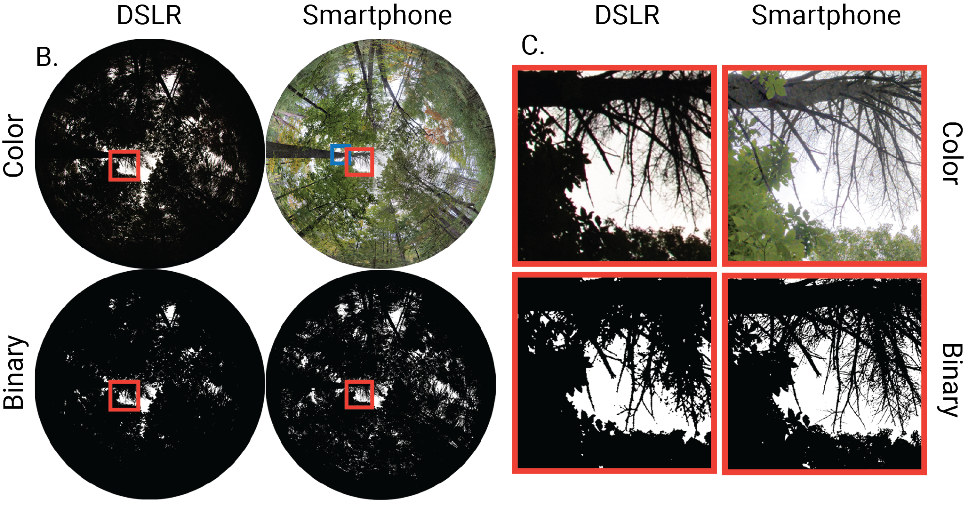
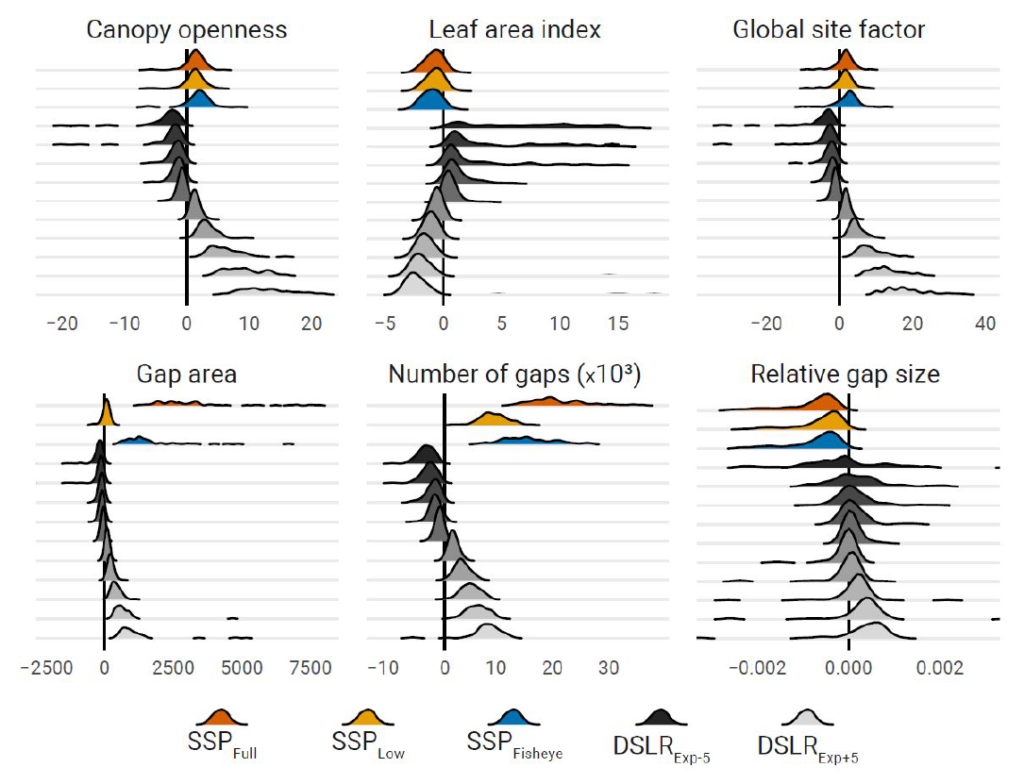
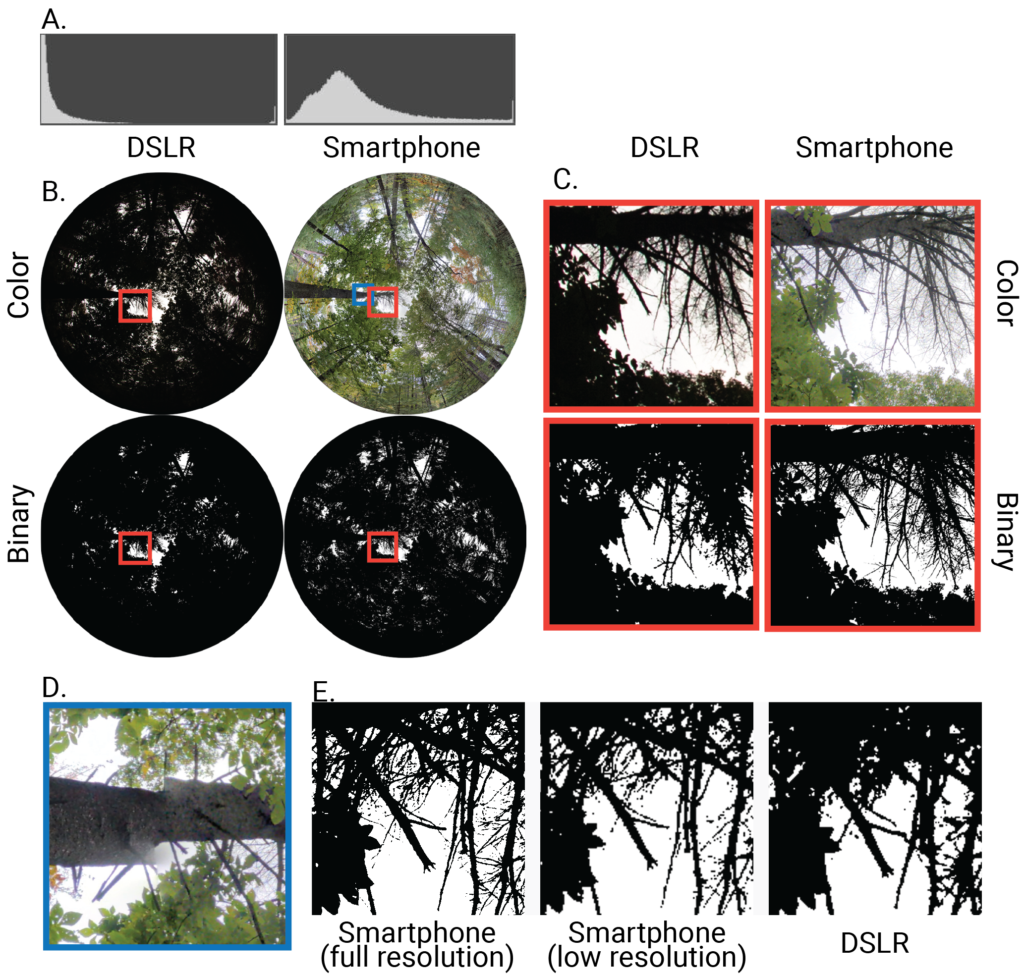
In my paper, I compared hemispherical photos taken with a DSLR against those extracted from a spherical panorama. I took consecutive photos at 72 sites. Overall, I found close concordance between measures of canopy structure (canopy openness) and light transmittance (global site factor) between the methods (R2 > 0.9). However, the smartphone images were of much greater clarity and therefore retained more detailed canopy structure that was lost in the DSLR images.
Although the stitching process occasionally produces artifacts in the image, the benefits of this method far outweigh the minor problems. Care when taking the panorama images, as well as ever-improving software will help to minimize imperfect stitching.
Overall, this method is not only a good alternative, it is probably even more accurate than traditional methods because of the greater clarity and robustness to variable exposure. My hope is that this paper will help drive more studies in the use of smartphone spheres for forest research. For instance, 360 horizontal panoramas could be extracted for basal measurement or entire spheres could be used to spatially map tree stands. The lower hemisphere could also be extracted and used to assess understory plant communities or leaf litter composition. Researchers could even enter the sphere with a virtual reality headset in order to identify tree species at their field sites from the comfort of their home.
Mostly, I’m hopeful that the ease of this method will allow more citizen scientists and non-experts to collect data for large-scale projects. After all, this method requires no exposure settings, no additional lenses, and is automatically levelled. The geolocation and compass heading can even be extracted from the image metadata to automatically orient the hemispherical image and set the location parameters in analysis software. Really, anyone with a cell phone can capture research-grade spherical images!